

What's new
Walks by the sea
Fred Olsen's Cruise lines for 2025
Christmas books reviews
DVD reviews
Doctor Who
Our new website - Enjoy Britain online www.enjoybritainonline.co.uk/
New CD releases
Discover Knightsbridge, London
Birdwatching and more

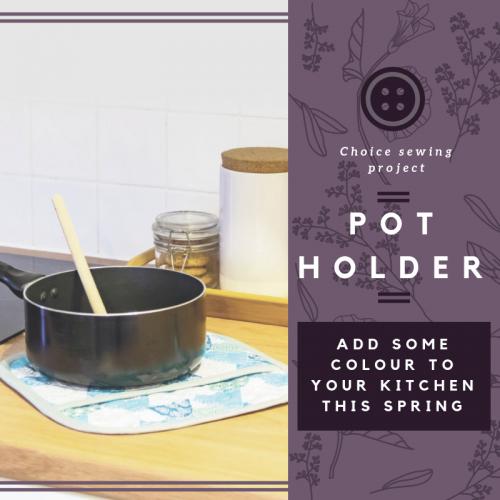
Add a splash of colour to your kitchen with this handy pot-holder. Quick to create and a good project to challenge beginners, this potholder makes a great gift or can be created for your own home – simply choose your fabric to suit.
My pot-holder uses the new Tokyo Blue fabric range from Threaders, which features a palette of cool blues complemented by bold greens and striking yellows for a beautiful contemporary finish.
To find out more about this stunning range, log on to: (www.crafterscompanion.co.uk).
1/2 metre of Threaders Tokyo Blue Fabric- Tokyo Mountains
Fat Quarter of heat resistant wadding or foam
One metre of co-ordinating 25mm bias binding
Co-ordinating cotton thread
Scrap of co-ordinating ribbon
Basic sewing kit
Gemini Stitch sewing machine
Finished size- 10in x 10in
1) Cut two 10in squares and two 10in x 7in rectangles of Tokyo Blue fabric. Cut one 10in square and one 10in x 7in rectangle of thermal fusible foam. Place the outer Tokyo Blue fabric squares wrong sides together, with the 10in square of thermal foam in between. Do exactly the same for the 7in x 10in rectangles
2) Quilt through all three layers on both of these panels. I used a simple free-motion stipple design, but you could also use straight line diagonal quilting
3) Add a 10in strip of bias binding to one of the long edges of the rectangular panel. To do this, open up the tape right-side down and align the raw edge against the straight edge of the panel. Stitch along the first fold line. Fold the bias tape over the reverse of the panel and slip stitch in place by hand. Trim off the excess
4) Place the pocket panel over the main panel and baste in place. Using a drinking glass and a rotary cutter, round off each of the four corners of your combined panels.
5) Apply the remaining bias tape to the pot-holder in the same way you did earlier. Begin in the centre of the base and ease the bias tape around the curves. When you reach the starting point, overlap the bias tape ends, folding in one edge of the tape to neaten the join
6) Fold the bias tape over and hand-stitch in place as you did before
7) Add a small loop of co-ordinating ribbon as a hanging loop.
April's book reviews
April's CD reviews
March's DVD review
March book reviews
March's CD reviews
February's DVDs
February's books
Winter books
January's DVD releases
Christmas book reviews
November DVD reviews
November's Music Reviews
November book reviews
October's DVD reviews
October's New CD releases
October's book reviews
September's DVD Reviews
DVD selection for August 2023
September's book reviews
Latest music reviews August 2023
August Round up
August Paperback Reviews
August hardback book reviews
July 2023 Roundup
Pick of the paperbacks July 2023
July 23 Hardback book reviews
July 2023 DVD releases
July 2023 CD reviews
Pick of the paperbacks June 2023
June DVDs
Hardback book reviews - June 2023
Simon Evans CD Reviews for June 2023
Tesco Summer indoors and out
Book reviews
May 2023 paperback book reviews
May 2023 Hardback book reviews
May's DVD Selection
May's CD selection
Round up of April 2023's book reviews
April 2023 paperback reviews
April 2023 Hardback book reviews
More March 2023 must-reads
March - Pick of the paperbacks
March hardback recommendations
Afternoon Tea
March 2023 - DVD releases
March 2023 Music
February 2023 Books Round up
Pick of the paperbacks - February 2023
Book reviews February 2023
DVD recommendations
February's music reviews
Freedom on two wheels
Make do and mend
Foray into the Fens
Christmas reads
Tasty, healthy recipes by Joanne Wood
Keeping fit and healthy with the Green goddess Part 2
Keeping fit and healthy with the Green goddess Part 1
Finger-licking Good! Tasty Chicken recipes
Beauty: Say 'Allo 'Allo to an alluring look
British Library: Palace of the printed word
Look good and feel great with CBD
Interior design: Inspiration for outdoor spaces
Summer fun at Belvoir Castle
Finding Fitness Starts With Fashion
‘In Vogue’ Veg – Cavolo Nero Sales Grow by 14%
Eat Continental and live longer
A life-affirming book... about death
Get Sewing: Floral bespoke notebook cover
Find your family fortunes... for FREE!
Beauty: Get set for spring...
Spanish Recipes: Small is beautiful
The Vegan Revolution
Interior Design: Maximise your living space
Pets need a spring clean too
Visit Family Tree Live
MasterChef: Classic with a Twist
Bob Dylan "Rock and Roll music wasn’t enough for me”
Plant Power Day: 7th March 2019
Interior Design: Less is more in minimalist home
A second chance at love
Interior Design: Great Gatsby Cabinet
The rise and rise of the birthday cake
Walking back to happiness
Baking With Veg
Totally Tina Tour
How to take care of your hair over-50
The nation's most popular cake recipes
Your views: Can you help?
Hail the grandparent aupairs
Beauty: Denise Welch "I love the shape I'm in at 60"
The Austerity Olympics
Healthy reasons to acquire a taste for olives
Grand Treats for Grandchildren
Declutter your home, and clear your mind
Scandi-style Mules for Swollen Feet
Beetroot and Walnut Cupcakes with Cream Cheese Frosting
In your garden: October
Dr Norman Croucher: The toughest summit of them all
Craft Corner: Sweet Easter Basket
Have your cake and eat your Easter egg too!
Interior Design: Moroccan inspired drawers
BR remembered... 70 years on
A gentleman's guide to spring fashion
Why antique jewellery is glittering
New Year, new beauty habits
Cliff Richard "I have a deeper faith now"
Do you remember? Oliver!
What we really look for in retirement living
Interior Design: Wedding bells on a budget
Counter culture: The revival of the board game
Jodie Whittaker: "Doctor Who is all about change"
85 year old Grandmother gains a PhD
Dame Eileen and a Crowning glory
Writing the story of you life
Why winter shouldn't stop you: don't wait until New Year
World' first 'wellness shed' stirs up mindfulness
Growing old is amazing
Don't miss out on the internet age
Prepare to feel ancient...
Hawks: Up close and personal
Studious retiree heads back to school
Garden Expert: Soaking up the sun
Emily Watson "I'ts such a gypsy life"
Here's to you Mrs Robinson
Brits Embracing 'Urban Birding'
Volunteering for Nature
The Secret to Younger Looking Eyes
Anti-ageing Options Part 2
Anti-ageing Options
End of the road for a pop icon
Reaching out to Dementia Sufferers: Sporting Memories Network
Are you ready for retirement?
Afternoon Tea Recipes
Surprisingly Good Wholegrain Recipes: Savoury
Staying safe in the Summer heat: Drowning prevention
Stardust Memories
Baking made easy
Cooking for one
The real cost of your wine
Walks by the sea
Fred Olsen's Cruise lines for 2025
Christmas books reviews
DVD reviews
Doctor Who
Our new website - Enjoy Britain online www.enjoybritainonline.co.uk/
New CD releases
Discover Knightsbridge, London
Birdwatching and more