

What's new
Walks by the sea
Fred Olsen's Cruise lines for 2025
Christmas books reviews
DVD reviews
Doctor Who
Our new website - Enjoy Britain online www.enjoybritainonline.co.uk/
New CD releases
Discover Knightsbridge, London
Birdwatching and more

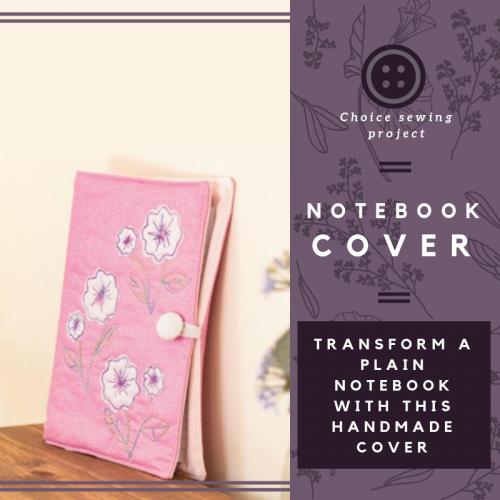
Transform any plain A5 notebook with a beautiful bespoke cover using this simple but effective project.
This perfectly girly design would make a great present for a relative or friend. I’ve used some of our Threaders Cotton Glitter Fabric for this project but you can put your own stamp on the notebook by using any fabric that you like.
Two fat quarters of Threaders Cotton Glitter Fabric
Fat Quarter of co-ordinating lining fabric
Fat Quarter of wadding
Variegated machine embroidery threads
2in to 3in of 0.5cm elastic
Sara Signature Button Factory
Crafter's Companion Stick and Spray for Fabric
Gemini Die Cutting Machine
Gemini Multimedia Flower dies
A5 notebook
Basic sewing kit
Gemini Stitch sewing machine
1) Cut a 10in x 15in rectangle of outer glitter fabric, lining fabric and wadding. Next, cut two 10in x 41⁄2in rectangles of lining fabric for the cover flaps
2) Using Stick and Spray, adhere your wadding to the wrong side of the outer fabric
3) Using the multi-media flower dies, cut out a selection of sizes in your co-ordinating glitter fabric. Place the shapes in position on the right side of the outer piece of fabric using Stick and Spray. This will become the front part of the book cover
4) Set up your machine for free motion stitching, using variegated threads to embroider the flowers in place. You can also embellish with free motion by adding stalks and leaves
5) Turn over a small double-folded hem on one long side of each lining flap and stitch in place. Press
6) Fold your piece of elastic in half and place the raw edges together on the front, left, short side of the outer panel. Baste in place
7) To make the cover , layer up the pieces in the following order: the lining fabric right side up; the lining flaps right side up; and the outer panel wrong side up. Pictures 5 and 6
8) Leaving a roughly 4in gap along the bottom edge, stitch all the way round. Trim the corners and, using the gap, turn through to the right side. Use a blunt tool to poke out the corners and press
9) Top stitch all the way round the cover , closing the gap as you go
10) Following the instruction for the Sara Signature Button Factory, make a self-covered button using your co-ordinating glitter fabric and sew it in place. Place the notebook inside your completed cover
April's book reviews
April's CD reviews
March's DVD review
March book reviews
March's CD reviews
February's DVDs
February's books
Winter books
January's DVD releases
Christmas book reviews
November DVD reviews
November's Music Reviews
November book reviews
October's DVD reviews
October's New CD releases
October's book reviews
September's DVD Reviews
DVD selection for August 2023
September's book reviews
Latest music reviews August 2023
August Round up
August Paperback Reviews
August hardback book reviews
July 2023 Roundup
Pick of the paperbacks July 2023
July 23 Hardback book reviews
July 2023 DVD releases
July 2023 CD reviews
Pick of the paperbacks June 2023
June DVDs
Hardback book reviews - June 2023
Simon Evans CD Reviews for June 2023
Tesco Summer indoors and out
Book reviews
May 2023 paperback book reviews
May 2023 Hardback book reviews
May's DVD Selection
May's CD selection
Round up of April 2023's book reviews
April 2023 paperback reviews
April 2023 Hardback book reviews
More March 2023 must-reads
March - Pick of the paperbacks
March hardback recommendations
Afternoon Tea
March 2023 - DVD releases
March 2023 Music
February 2023 Books Round up
Pick of the paperbacks - February 2023
Book reviews February 2023
DVD recommendations
February's music reviews
Freedom on two wheels
Make do and mend
Foray into the Fens
Christmas reads
Tasty, healthy recipes by Joanne Wood
Keeping fit and healthy with the Green goddess Part 2
Keeping fit and healthy with the Green goddess Part 1
Finger-licking Good! Tasty Chicken recipes
Beauty: Say 'Allo 'Allo to an alluring look
British Library: Palace of the printed word
Look good and feel great with CBD
Interior design: Inspiration for outdoor spaces
Summer fun at Belvoir Castle
Finding Fitness Starts With Fashion
‘In Vogue’ Veg – Cavolo Nero Sales Grow by 14%
Eat Continental and live longer
A life-affirming book... about death
Find your family fortunes... for FREE!
Beauty: Get set for spring...
Spanish Recipes: Small is beautiful
The Vegan Revolution
Interior Design: Maximise your living space
Pets need a spring clean too
Visit Family Tree Live
MasterChef: Classic with a Twist
Get Sewing: Quilted pot-holder
Bob Dylan "Rock and Roll music wasn’t enough for me”
Plant Power Day: 7th March 2019
Interior Design: Less is more in minimalist home
A second chance at love
Interior Design: Great Gatsby Cabinet
The rise and rise of the birthday cake
Walking back to happiness
Baking With Veg
Totally Tina Tour
How to take care of your hair over-50
The nation's most popular cake recipes
Your views: Can you help?
Hail the grandparent aupairs
Beauty: Denise Welch "I love the shape I'm in at 60"
The Austerity Olympics
Healthy reasons to acquire a taste for olives
Grand Treats for Grandchildren
Declutter your home, and clear your mind
Scandi-style Mules for Swollen Feet
Beetroot and Walnut Cupcakes with Cream Cheese Frosting
In your garden: October
Dr Norman Croucher: The toughest summit of them all
Craft Corner: Sweet Easter Basket
Have your cake and eat your Easter egg too!
Interior Design: Moroccan inspired drawers
BR remembered... 70 years on
A gentleman's guide to spring fashion
Why antique jewellery is glittering
New Year, new beauty habits
Cliff Richard "I have a deeper faith now"
Do you remember? Oliver!
What we really look for in retirement living
Interior Design: Wedding bells on a budget
Counter culture: The revival of the board game
Jodie Whittaker: "Doctor Who is all about change"
85 year old Grandmother gains a PhD
Dame Eileen and a Crowning glory
Writing the story of you life
Why winter shouldn't stop you: don't wait until New Year
World' first 'wellness shed' stirs up mindfulness
Growing old is amazing
Don't miss out on the internet age
Prepare to feel ancient...
Hawks: Up close and personal
Studious retiree heads back to school
Garden Expert: Soaking up the sun
Emily Watson "I'ts such a gypsy life"
Here's to you Mrs Robinson
Brits Embracing 'Urban Birding'
Volunteering for Nature
The Secret to Younger Looking Eyes
Anti-ageing Options Part 2
Anti-ageing Options
End of the road for a pop icon
Reaching out to Dementia Sufferers: Sporting Memories Network
Are you ready for retirement?
Afternoon Tea Recipes
Surprisingly Good Wholegrain Recipes: Savoury
Staying safe in the Summer heat: Drowning prevention
Stardust Memories
Baking made easy
Cooking for one
The real cost of your wine
Walks by the sea
Fred Olsen's Cruise lines for 2025
Christmas books reviews
DVD reviews
Doctor Who
Our new website - Enjoy Britain online www.enjoybritainonline.co.uk/
New CD releases
Discover Knightsbridge, London
Birdwatching and more